Get ready to impress your Valentine with a beautifully decorated cookie that's as simple to create as it is delightful to receive. With just a few key supplies and a dash of creativity, you'll have a sweet treat that speaks volumes of your affection. Check out the supply list below and let the decorating fun begin!
Supply List:
Red flood icing
Pink flood icing
White flood icing
Red detail icing
White detail icing
A cookie, because every masterpiece starts with a delicious base!
Curious to see how it all comes together? Watch the video tutorial below and unleash your inner artist. Happy decorating!
In today's blog, we're exploring the art of decorating a heart cookie
using the wet-on-wet technique. This
approach offers a simple yet
delightful "marbled" look, where there's no strict definition of a
"right" or "wrong" outcome. Dive in and let the creative journey begin!
🎨🍪
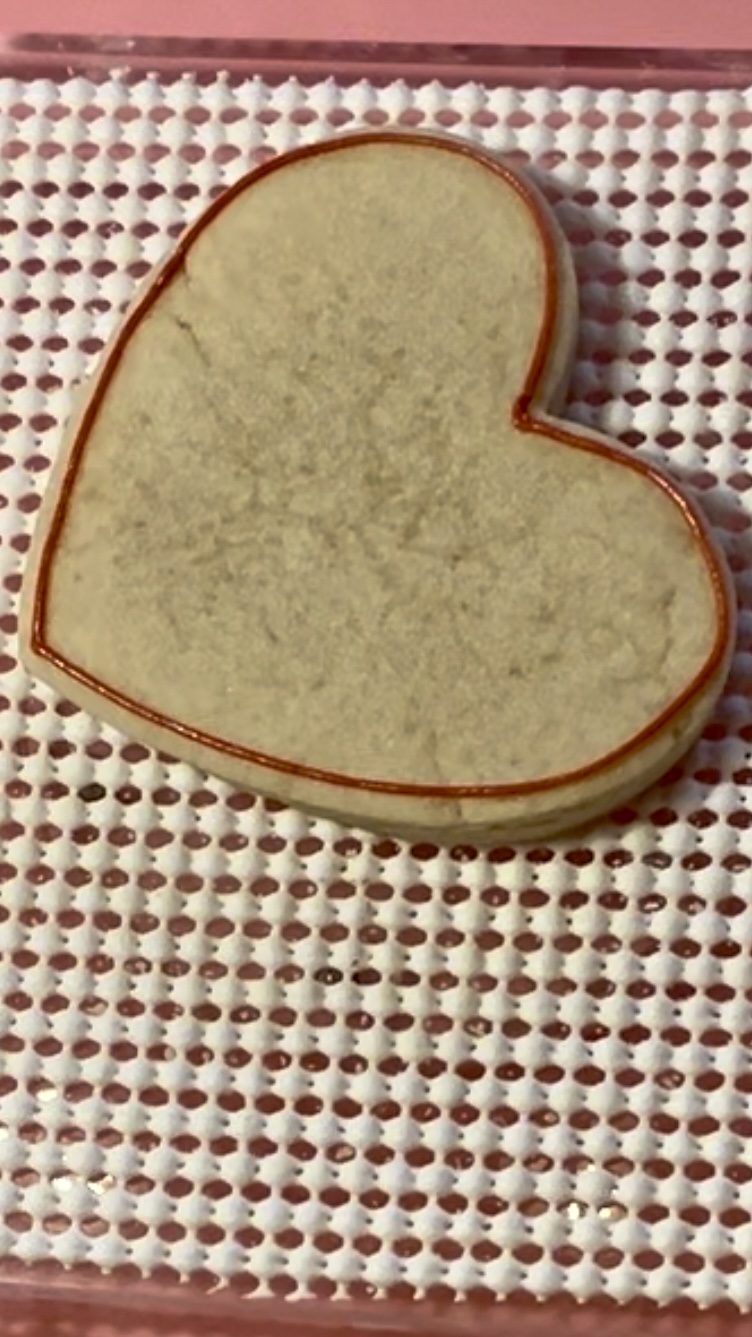
Step 1 - Using detail icing, outline the heart along the edge of the cookie. If you are worried about decorating right on the edge, you can pull the line in a little bit - just try to pull it in a consistent amount all the way around the cookie.
Step 2 - Using flood icing, fill inside the lines, and then use your scribe to fill in all gaps and give the cookie a smooth finish. Use a little less flood icing than normal because we are going to add additional flood icing to the white. Immediately proceed to the next step - this is a wet-on-wet technique.
Step 3 - I used light pink and red flood icings for this step and the next, but you can use any colors you have available - even adding 3 or more colors. Just be sure you do not "overfill" the cookie.
Using pink flood icing, add a few random squiggles directly to the web base flood icing.
Step 4 - Using red flood icing add a few more random squiggles to the base flood icing. Remember, there is no "right" or "wrong" way to do this - do each cookie a little differently and they'll all have a unique finished look!
Step 5 - Using your scribe, pull it through the icing, mixing the colors into a random pattern. Don't over mix on this part or your colors will all blend together and you won't have as much of a marbled look. If you see that you need more of a color in a certain area, it's fine to add a little more flood icing to the cookie.
I finished my cookie by adding a red dot border around the edge of the cookie. You can view that in the video below. Happy Cookie'ing!
In today's blog post, I'll guide you through creating a stunning ruffled heart cookie. But before we dive
into the decorating process, I want to express my gratitude for your continued support. Finding the art of "cookie'ing" came into my life unexpectedly, yet at the perfect moment. I was unknowingly seeking a spark for my creativity, and this sweet journey has been a divine gift. There are moments during decorating when I pause and offer thanks for this beautiful blessing—I genuinely believe that "All Good Things" come from Him (James 1:17).
Now, let's embark on the joy of cookie decoration! 🍪✨
Step 1 - Using detail icing, add a scalloped edge all the way around the cookie, making sure it's fairly even all the way around. My scalloped edge is a little less than 1/2 of an inch in height. The bottom of the scallops will be covered up, so don't worry if it's not perfect.
Step 2 - Using detail icing, draw a heart onto the cookie, passing over the bottom of the scalloped edge all the way around the cookie. Then add a few squiggles of detail icing to the center of the cookie - this just helps with the "puff" look that we all love!
Step 3 - With your flood icing, fill and smooth the inside of the heart. Give it a nice smooth finish. Immediately proceed to step 4 - this is a wet-on-wet technique.
Step 4 - I used two colors of pink icing for the dots, but one or even more will be fine - whatever you like best!! Using medium pink flood, add a few polka dots to the white flood. Immediately proceed to the next step.
Step 5 - Using your light pink flood, add more polka dots. SUPER CUTE!! Let it crust and then it's ready to share!
Presenting the absolute cutest cookie, and though it's not my design, I
regrettably can't recall the talented
creator. My sincere apologies for
not giving proper credit in advance. Nevertheless, I hope you enjoy
decorating this cookie as much as I did—it's just oozing with sassiness!
🍪💁♀️
Step 1 - Using detail icing, outline the heart. I kept my line pretty close to the edge, but you can move in just a tiny bit if that's more comfortable for you.
Step 2 - Using flood icing, fill inside the drawn lines. Then use your scribe to fill all gaps and give the cookie a smooth finish. Immediately proceed to the next step, which is a wet-on-wet technique.
Step 3 - Using flood icing, add dots to the wet flood. Don't overfill. Set the cookie aside to crush - approximately 20-30 minutes, maybe a little less if you place into a dehydrator.
The rest of the steps are detailed on the following video - but I'll still walk you through them -
Step 4 - Once the cookie has crusted, using your black detail icing, outline each of the polka dots. Also outline the outside of the heart.
Step 5 - Using a hot pink detail icing, draw the ribbon and bow outline across the cookie. Be sure to draw complete lines across the ends (not pictured here)
Step 6 - Using flood icing fill in the bow and ribbon, using your scribe to fill gaps and smooth. You will fill these lines in multiple steps - filling sections that do not touch, allowing the sections to crust over and then filling more. Here's the order I filled mine.
- fill both sides of the bow - allow it to crust
- fill the outside ribbon lines on both sides and the middle of the bow - allow it to crust
That's it! Woolah - you have a super sassy Valentine heart!
Today's cookie class was a real blast! I have a genuine passion for hosting cookie classes, and the synergy
between my background in education and my newfound love for "cookie'ing" creates the perfect blend for me!
I hope you all had as much enjoyment as I did!! We discussed a lot of information about recipes, icings and other details. This handout will link you to resources and good reminders for your at-home baking and decorating!
For those eager to try decorating at home, make use of this comprehensive decorating guide. Additionally, catch an overview in the accompanying video. 🍪🎓
I'm completely smitten with the brush embroidery technique on this heart cookie! Its feminine and sweet
appearance can elevate various cookie styles, making them absolutely beautiful. If you're new to brush embroidery, there are fantastic tutorial videos on this simple technique. Head over to YouTube and search "cookie brush embroidery" for some helpful guides.
Unfortunately, my attempt to record the decorating process resulted in a video mishap... my sincere apologies! Nevertheless, I managed to capture some captivating images for you to enjoy. 🌸🍪
Step 1: Using detail icing, draw about 5 or 6 scallops along the edge of the cookie. Then, using a small, clean, food-safe paint brush, brush lightly along the scallop, brushing the icing in towards the center of the cookie - about 1/4 of an inch. Don't worry if all of your inside edges aren't exactly the same distance, we will flood the inside with a heart.
You only complete a few scallops at a time because you don't want the icing to dry.
Continue this process all the way around the cookie.
This finished brushed embroidered edge should look like this.
Step 2 - using detail icing, outline a heart, covering the inside edges of the brush embroidery. Place a few squiggles inside the heart, using your detail icing. This helps us get a pretty, puffy look with our icing.
Step 3 - With your flood icing, fill inside the heart lines and then use your scribe to fill and smooth the flood icing.
That's it - Can you believe how easy it is to create a cookie this beautiful?? I can't wait to see your designs - please share them!!
Welcome back to another enchanting cookie heart tutorial! I trust you're absolutely enamored with these
tutorials! Please do share your creative at-home decorating designs—I'm eagerly anticipating seeing your wonderful progress!
In
today's session, we'll be crafting an adorable heart cookie that
resembles a charming clothesline adorned with hearts. Let's dive in and
create something truly delightful!
Supply list
heart shaped cookie
black detail icing
red detail icing
light pink detail icing
medium pink detail icing
white detail icing
white flood icing
Of course you can make this cookie without all of the different heart colors - it will still look beautiful if you only have one color for your hearts.
This will follow the same process as our heart flower design. But I'll still list the steps.
Step 1: Using the white detail icing to outline the heart shape. You
have the option to go right up to the edge for a seamless look, or
maintain a consistent small distance from the edge—both approaches yield
fantastic results!
Step 2: Utilize the white flood icing to generously cover the entire cookie, creating a delectable and mouthwatering treat!
Step 3: With your scribe, fill in any gaps and achieve a smooth finish. Place
the cookie in front of a small fan on low for approximately 30 minutes,
or if you have a dehydrator, set it on the lowest setting for 20
minutes. It's essential for the cookie to develop a crust before moving
on to the next step.
Steps 4 - the end are detailed in the video below - but I'll still briefly explain them.
Using black detail icing, draw your lines across your heart. I added 4 lines, but you can make your own design. Let your creativity be your guide! I also added a little bow in the upper right corner, you can add one to yours or not.
Alternating between the red, medium pink, and light pink detail icings, pipe tiny hearts along your black lines. Space them however you think looks best. I'm sure the finished cookie will be as tasty as it is beautiful! Happy piping!